Installation
The PICO is a tool that must be installed on a computer or a server. The visual interface is made with Dash from Plotly and can be opened in the majority of web browser. It is compatible with Linux, Mac and Windows.
The simplest way to install is using the PyPI package. The PICO is also available with Docker. It requires Python <3.13, >=3.8.
Prerequisites
The first step is ensuring Python, PyPI and an environment manager are installed. Usually pip and venv are natively included in Python.
For Windows, you also need to make sure that Microsoft Visual C++ >= 14.0 is installed, otherwise an error will occur while installing pico-ml.
Linux installation (or WSL)
We recommend using pyenv as a python version manager if you happen to use or developp multiple projects with potential(probably) different versions of python. With pyenv a user can declare a local version of python per project directory. This version will be taken into account automatically by venv when creating the virtual enironment.
Pyenv
It is not an obligation to use pyenv (or a Python versions manager), but it might prevent things from breaking in the future and it is good practice.
To install
It installs everything needed to build python versions later
sudo apt update; sudo apt install build-essential libssl-dev zlib1g-dev \
libbz2-dev libreadline-dev libsqlite3-dev curl git \
libncursesw5-dev xz-utils tk-dev libxml2-dev libxmlsec1-dev libffi-dev liblzma-dev
Then
curl https://pyenv.run | bash
Also add this to the .bashrc file (provided by the installation message of pyenv)
export PYENV_ROOT="$HOME/.pyenv"
[[ -d $PYENV_ROOT/bin ]] && export PATH="$PYENV_ROOT/bin:$PATH"
eval "$(pyenv init -)"
Dont forget to source the bashrc.
To setup and use
With VERSION = 3.12.7
~$ pyenv doctor
~$ pyenv install VERSION
VERSION can be any python version needed. PICO requires Python <3.13, >=3.8. This command is also the thing to do to install a new python version.
Then activate the installed version as the current global version with :
pyenv global VERSION
(the command python will then refer to that VERSION)
For each project
Specify which version of python must be used in a specific directory with :
pyenv local VERSION
It creates a file .python-version in the current directory, the VERSION must have been installed already.
By creating a venv environment afterwards, it will automatically pickup the python version to use with .python-version
Python
Follow this if you skipped the Pyenv step. In order to install Python, you need to go to this link. Download your preferred version (PICO requires Python <3.13, >=3.8) and proceed with the installation. You can also follow this tutorial for further details.
Virtual environment
Make sure a virtual environment manager is installed. We use venv which is normally included in Python. It is good practice to encapsulate each project in specific envs to prevent collisions of packages versions and dependencies.
Simply create an environment with
python -m venv NAME
Then activate the env
source NAME/bin/activate
(To deactivate simply do deactivate.)
PyPI
Make sure PyPI is installed/functional. It is also normally included in Python. And install PICO with
pip install pico-ml
Mac installation
We recommend using pyenv as a python version manager if you happen to use or developp multiple projects with potential(probably) different versions of python. With pyenv a user can declare a local version of python per project directory. This version will be taken into account automatically by venv when creating the virtual enironment.
Pyenv
To install
Reference with more details and explanations.
You need to have ‘Homebrew’ installed first (Reference)
/bin/bash -c "$(curl -fsSL https://raw.githubusercontent.com/Homebrew/install/HEAD/install.sh)"
Then install pyenv from Homebrew
brew install pyenv
Also add this to the ~/.zprofile file (provided by the installation message of pyenv)
export PYENV_ROOT="$HOME/.pyenv"
[[ -d $PYENV_ROOT/bin ]] && export PATH="$PYENV_ROOT/bin:$PATH"
eval "$(pyenv init -)"
Dont forget to source the zprofile
source ~/.zprofile # Or just restart your terminal
Generally there is also a need for the xy package, better to do it now
brew install xz
To setup and use
With VERSION = 3.12.7
pyenv install VERSION
VERSION can be any python version needed. PICO requires Python <3.13, >=3.8. This command is also the thing to do to install a new python version.
Then activate the installed version as the current global version with
pyenv global VERSION
(the command python will then refer to that VERSION)
For each project
Specify which version of python must be used in a specific directory with
pyenv local VERSION
It creates a file .python-version in the current directory, the VERSION must have been installed already.
By creating a venv environment afterwards, it will automatically pickup the python version to use with .python-version
Virtual environment
Make sure a virtual environment manager is installed. We use venv which is normally included in Python. It is good practice to encapsulate each project in specific envs to prevent collisions of packages versions and dependencies.
Simply create an environment with
python -m venv NAME
Then activate the env
source NAME/bin/activate
(To deactivate simply do deactivate.)
PyPI
Make sure PyPI is installed/functional. It is also normally included in Python. And install PICO with
pip install pico-ml
Windows installation
Don’t forget to check that Microsoft Visual C++ is correctly installed. Also use the cmd prompt, not the powershell.
Python
In order to install Python, you need to go to this link. Download your preferred version (PICO requires Python <3.13, >=3.8) and proceed with the installation. You can also follow this tutorial for further details.
WARNING : Don’t forget the select Add Python 3.X to PATH on the first page ! 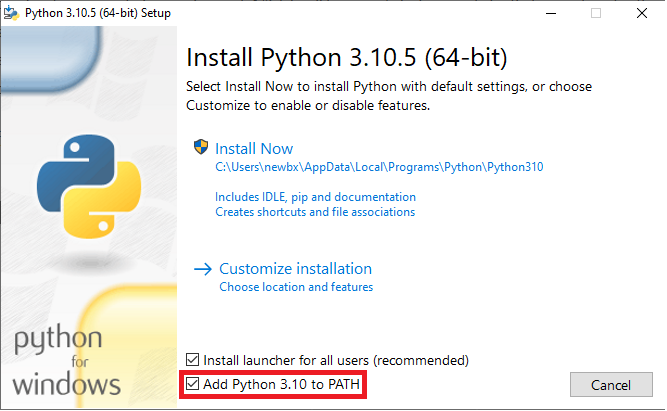
To verify that Python is in the PATH, you can open a new terminal (cmd prompt), type Python and press Enter. If you get something like this, it’s all good. 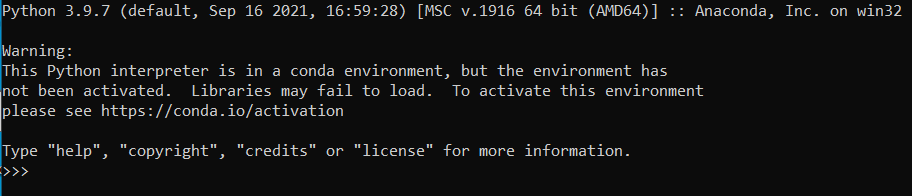 You can type
 exit() to exit Python.
Otherwise, you have to double-click again on the python.exe file you downloaded at the beginning and click Repair. Then click on Next. Then you can click on add to path and install. 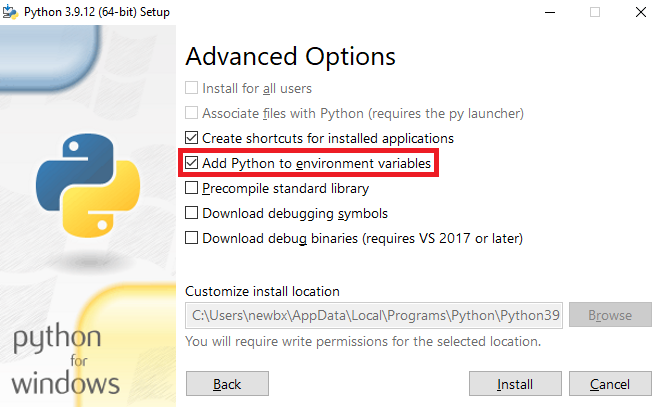
Microsoft Visual C++ requirement
To make sure PICO and all it’s dependencies work properly, you need Microsoft Visual C++ 14.0 or later. To check if the correct version of Microsoft Visual C++ is installed on your computer, you can open the Control Panel from the start menu, click on “uninstall app” and scroll down to see which version, if any, of Microsoft Visual C++ is installed.
Install new version
In order to install Microsoft Visual C++, you need to go to this link and click on the “Download Build Tools” button. Once the installer is downloaded and installed, select the “Desktop development in C++” block and click install at the bottom. 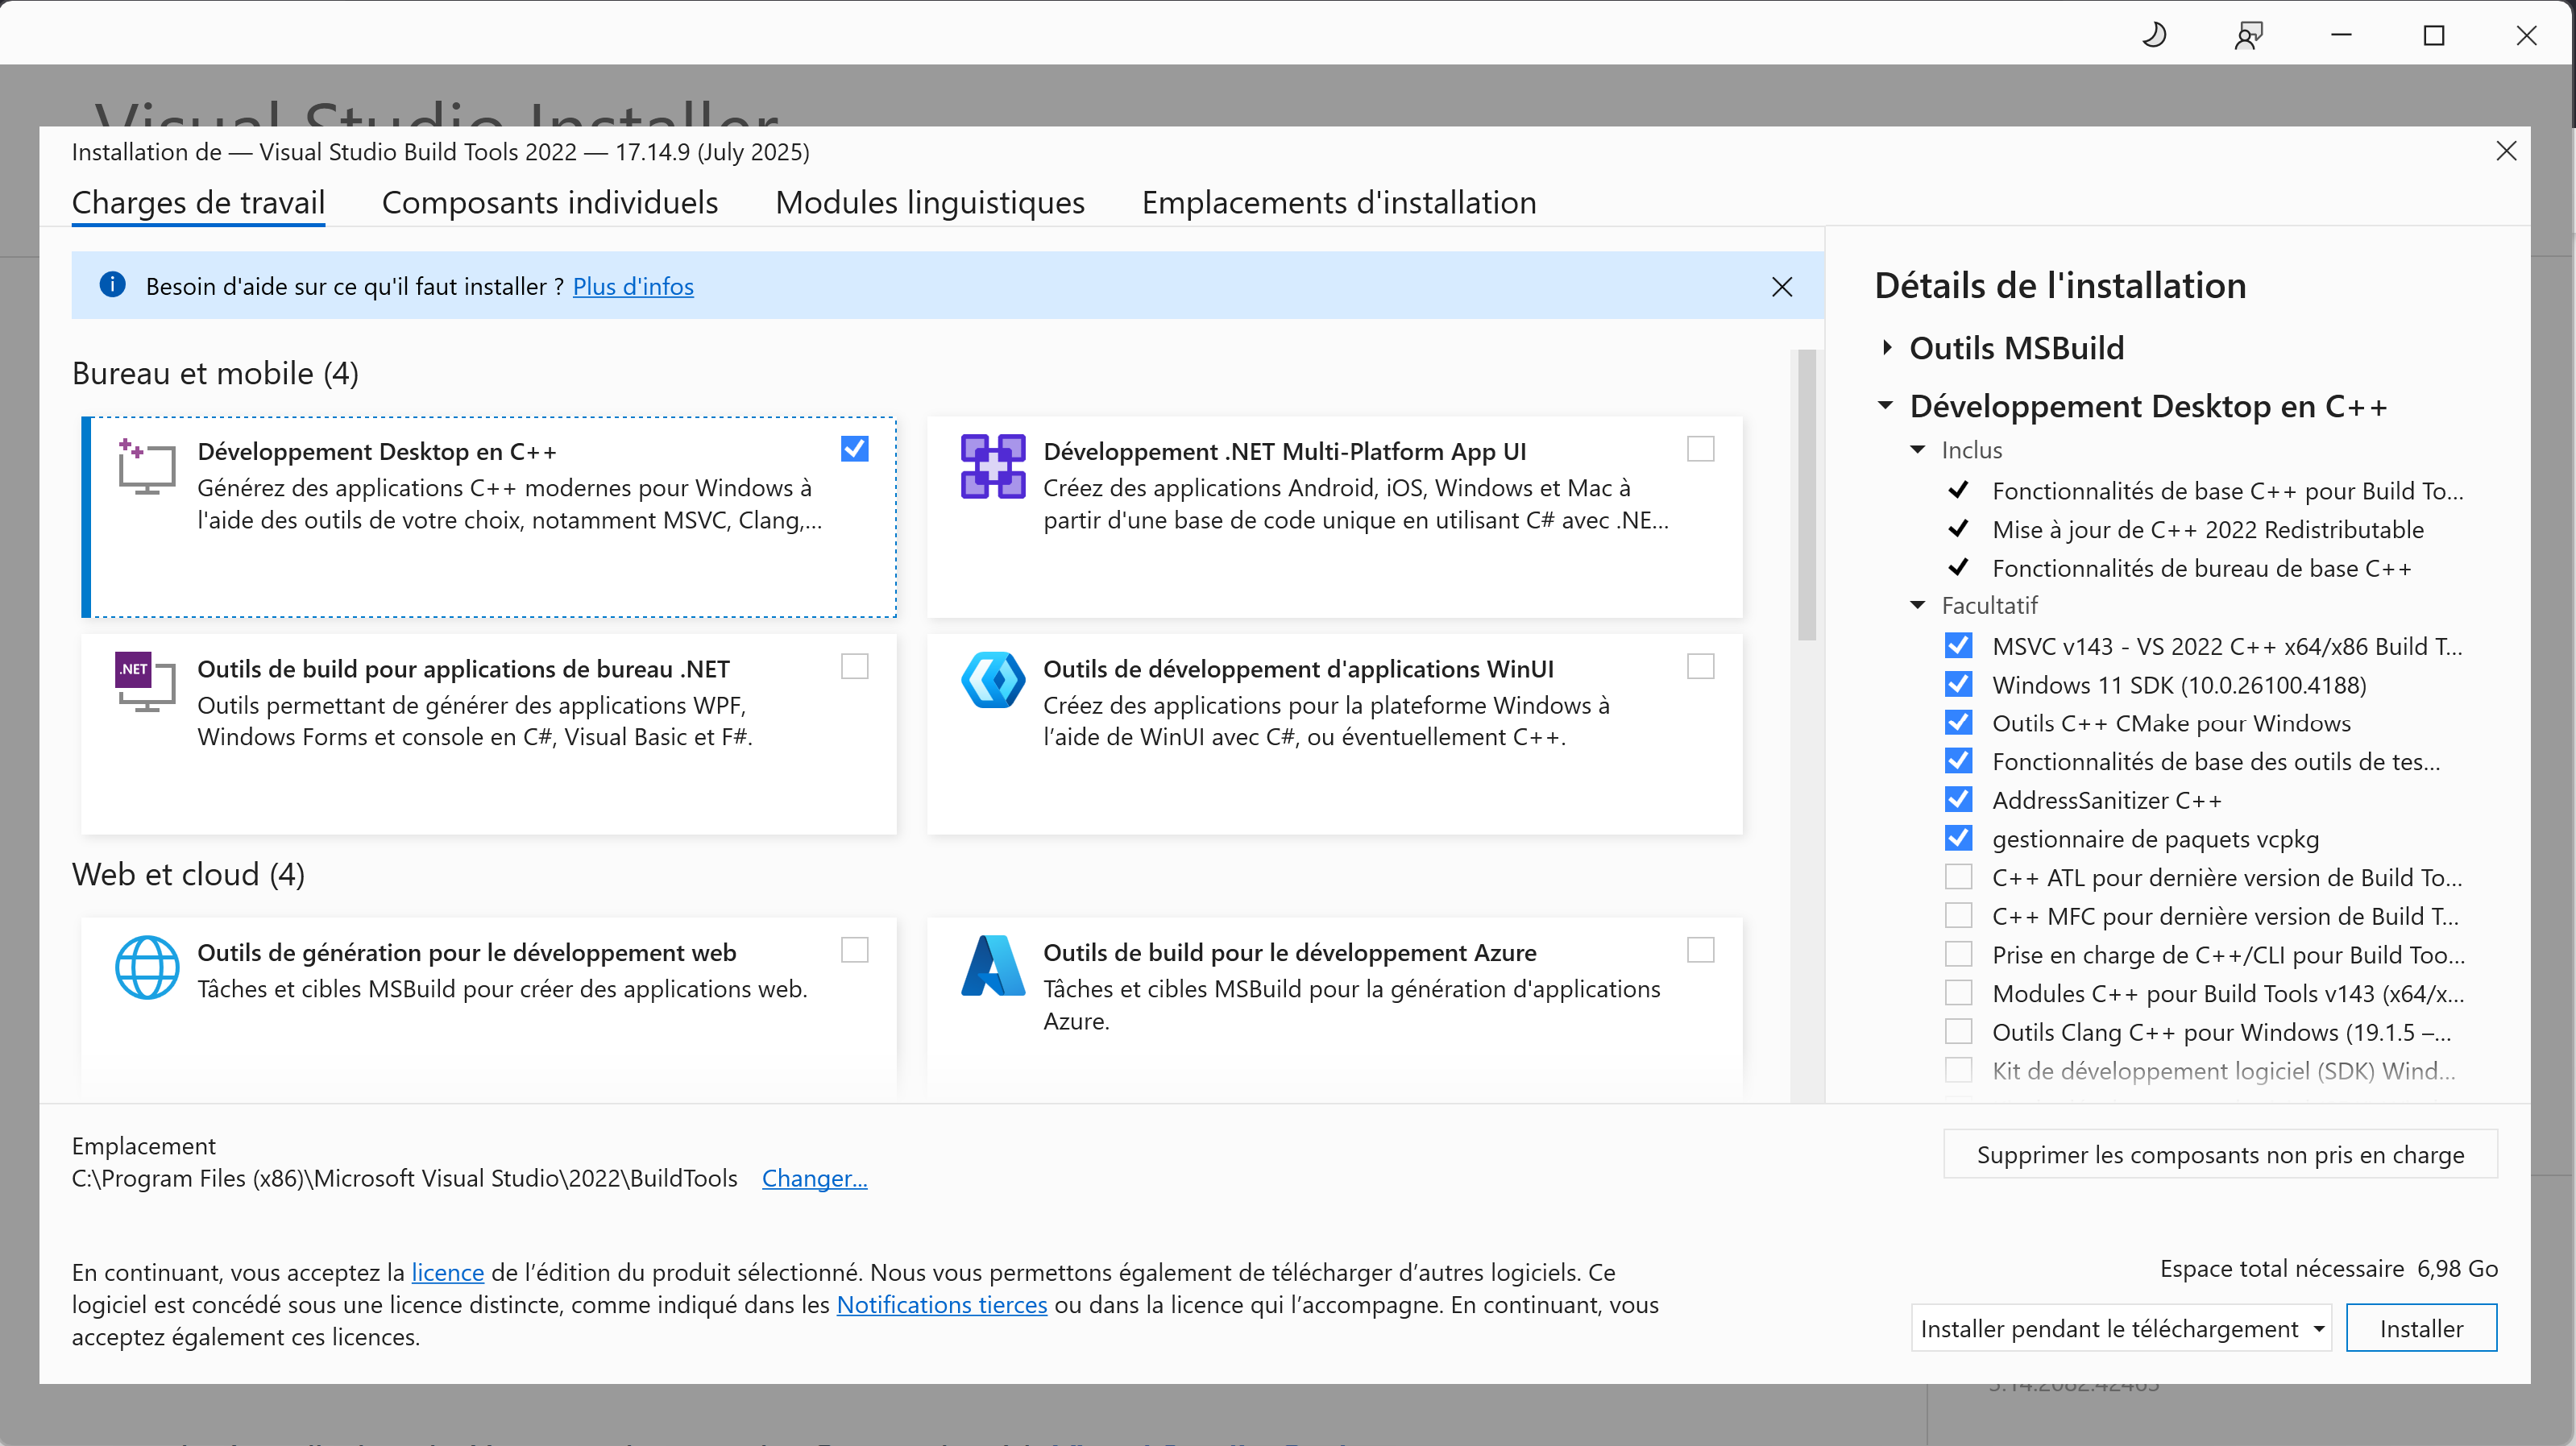
You will need to restart your computer once it is done to complete the installlation.
Moving to appropriate directory
The cmd prompt of windows should open directly in your home directory (your user directory). You can check that by looking at the beginning of the line before the “>” character. It should read
C:\Users\YOURNAME>
By typing the command dir and pressing ‘enter’, you should obtain a list of your files and folders (directories) in your home.
C:\Users\YOURNAME>dir
Now type the command mkdir pico_project : mkdir stands for ‘make directory’ and pico_project will be the name of the folder. It will be visible in your File explorer. Move inside that directory with cd pico_project.
Virtual environment
Make sure a virtual environment manager is installed, we use venv which is normally included in Python. It is good practice to encapsulate each project in specific envs to prevent collisions of versions.
To check the presence of venv
python -m venv -h
It should display the list of arguments of venv.
Then create an environment with
python -m venv env_PICO
Activate the environment with
env_PICO\bin\activate
Parenthesis should have appeared at the very beginning of command lines
(env_PICO) C:\Users\YOURNAME\pico_project>
PyPI
Make sure PyPI is installed/functional, use pip -h. It is also normally included in Python.
Then install PICO with
pip install pico-ml